Quart: A New Dress for an Old Maid
The next article in the series covering Quart comes to you from Emily Griffin. Emily is a communications developer, jeweler, mom and general DIY maven. She's also stuck with me for life! You can check out her DIY blog or Etsy store to see more.
Emily is going to cover what went into the aesthetic redesign of what is now the host for my little Raspberry Pi symbiote. I think the result is pretty awesome. Take it away Em.
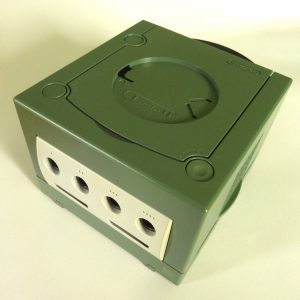
For those of you wondering when Nintendo released a green version of the GameCube - well, they didn't. Thanks to the technological advances of the aerosol paint industry, your GameCube can be any color you like!
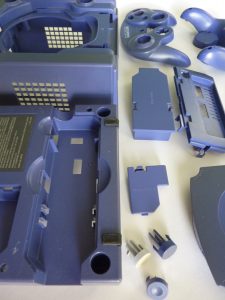
The first step was to break the GameCube down. For full disclosure, I didn't personally do this part, but I was assured that beyond the security bits, it basically fell to pieces. If you're following along at home, don't forget to take off any stickers and residue left behind. I wish I had noticed the AMD sticker on the front of the 'Cube. I gathered all the pieces, including the controller parts - and don't forget the plug end, like we did - and gave them a good wipe-down with TSP.
Before we get too into painting, an option for those of you with lighter-colored cases (white, silver, gray, etc.) may be to dye your parts instead of painting, but keep in mind that the dyes are translucent, and won't work well on darker colors.
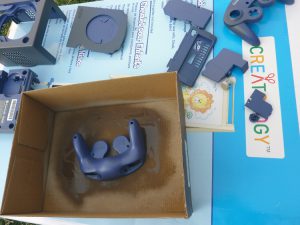
The first product I used was a clear aerosol primer that bonds with plastics made by Valspar. These come in a few colors, too, but none of them were close to what I had in mind. Once primed, you can use any regular spray paint - which opens up a wealth of color and finish options. Two coats of the primer, ten minutes apart, and then an hour of drying time before spray painting. It's worth noting that the primer was basically invisible and didn't change the texture or finish at all.
I followed up with two light coats of spray paint. It's important to keep the can 18" to 24" away from the chassis while spraying if you want to keep the detail (engraved words, textures, etc.) in your finished piece, and to avoid drips.
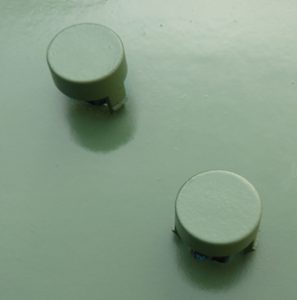
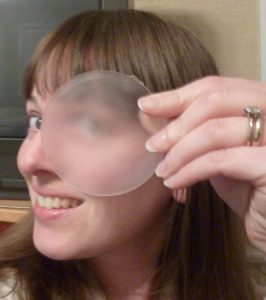
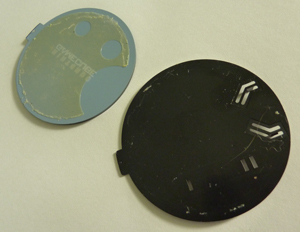 So after everything was dry and reassembled (yeah, I didn't do that part either), we were still left with the GameCube logo on the lid. Well, this is hardly a GameCube anymore, is it? After some careful reverse-engineering (read: cram fingernails in and see if it comes apart) it was discovered that the logo disc is in two pieces, glued together. A flathead jeweler's screwdriver was helpful in prying apart the two halves - but be careful, the pieces are pretty fragile. Go slowly all around the edge.
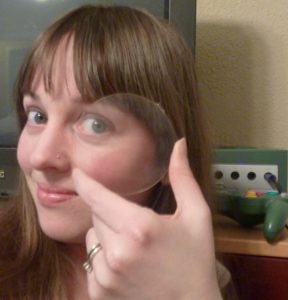
The top half is clear acrylic with the logo painted (printed? decaled?) on the back. The adhesive came off fairly easily with some Goo-Gone and a little scraping and peeling. The logo proved more challenging - I tried a few different cleaners/solvents and a Mr. Clean Magic Eraser before giving up and trying the last-resort sandpaper. While I didn't want to scratch the acrylic, there just didn't seem to be an alternative, so I set up with a 600-grit wet/dry sandpaper, the finest I could find. The sandpaper easily took off the logo and didn't even leave the disc too terribly scratched, but it did look a little cloudy.
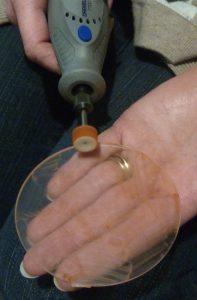
I'm always looking for a reason to bust out my Dremel, so I decided to give the acrylic a quick buff with some polishing compound. The disc looked good as new (except where I accidentally chipped off the edge - whoops.)
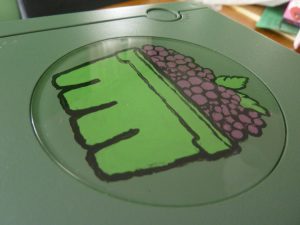
Now, if I wanted to do things the easy way, here is where I would have printed off a copy of the logo and sandwiched it back between the two pieces of the disc. But that's no fun, is it? A unique piece of hardware like this deserves a unique logo - so I decided to hand paint it on the back of the acrylic. (Actually, my printer is out of ink. And I'm cheap.)
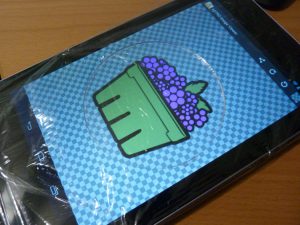
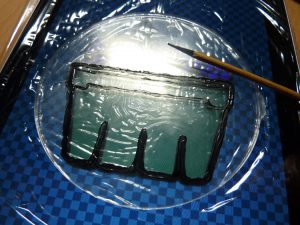
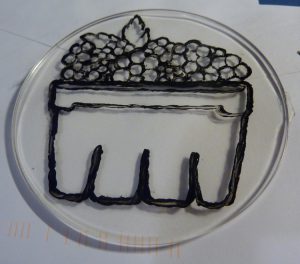
Here's my setup: plastic-wrap covered tablet with the logo at the appropriate size (plugged in, with the screen set to stay on, of course), acrylic paints, teeeeny tiny brush, a wooden skewer, and a table lamp. I reversed the logo on the screen and centered the top disc on the plastic wrap.
First, I traced the outline - that way, I didn't need to be too careful while I colored. The skewer was useful in scraping and pushing paint if I needed to change the lines a bit.
 |
 |
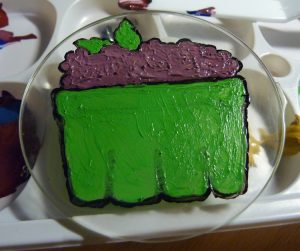
When the outlines were done, I removed the disc from the tablet and flooded the interior parts with colored paint.
 |
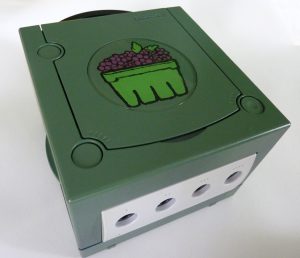
Let dry overnight, hit the back with a quick shot of spray paint, put the discs back together, and voila!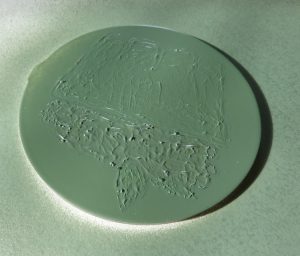 Quart's new skin!
 |
 |
Quart: OpenELEC branch commit breakdown
I've been putting off dealing with the documentation of all the snags I've run into thus far and decided to just take a look at the commit log and rationalize each one. Some of these are fairly specific to my situation, while others may have broader implications.
Once the gamecon module was added to the build, this was the first and largest hurdle to jump in getting gamepad input in OpenELEC for Raspberry Pi. Here's the situation:
the gamepad device is simply not utilized, or even logged as enabled, though running evtest shows that it's blocked. The first place you might look for a solution, understanding that you're using Linux window events, is LinuxInputDevices.cpp. Scrolling down and seeing the Linux input device type enumeration confirms the supposition that you are on the right track.
Your supposition, as it turns out, is bad and you should feel bad because the GetInfo method is going to be called to determine what type your little device falls into, and it will do this:
...since the button counting loop stopped at BTN_JOYSTICK (this is the index at witch joystick/gamepad buttons start), num_buttons is 0 and your gamepad is left as LI_DEVICE_NONE. Unfortunately the solution is not just to bump the index limit up on the loop, because there is no codepath in the application loop for CLinuxInputDevice into CButtonTranslator's TranslateJoystickString method.
There are only two paths to TranslateJoystickString in CApplication. One is the event server, the other uses SDL. The latter seemed an easier, cleaner option to me. Theoretically, it would just mean the inclusion of libSDL in the build.
This is from the graphic configuration script in the OpenELEC build system.
We start to see how a problem like this could happen, because right now it's relegated to users running XBMC in Linux without X, who require joystick support sans event server. One could make an argument of course that you can use SDL input without the rest, which is what I did.
The solution was mostly just changing a few variables. I commented out the lines above and changed some defines in system.h. The only real functional issue was that after XBMC's CLinuxInputDevice assigns LI_DEVICE_NONE to the gamepad devices it continues to hold onto block file descriptors, so when SDL uses evdev to grab the device, it's blocked as well. This is addressed in SDL_input_only.patch, after the call to GetInfo.
This was absolutely infuriating, and took a good bit of GDB to figure out. The failure mode is that a button will behave as though it is being held down, often after advancing a menu, so depending on the next focused item on each screen you may be in for a fun guided tour through the UI. The offender this time was the SDL joystick class. As it turns out, evdev drivers can miss an event. I get a sense that it happens when the system is taxed, so the situation is exacerbated on RPi, but certainly not unique to it. When an event is missed evdev transmits a SYN_DROPPED event, at which point it can be polled to correct internal buffers. Unfortunately there is no concept of SYN_DROPPED as of SDL 1.2.15. Fortunately a contributor named Simon has proposed a patch, which was merged in last month, and addresses this issue with regard to axes, but not buttons. I modified it to poll the button states and merged those changes back into the 1.2.15 joystick class with this patch.
Originally I was going to fix these issues by using the js* devices in SDL and applying calibrations with jscal (I added linuxconsole package to my build in order to support it), but I really wanted the D-Pad to be supported properly as a HAT input, which is unique to evdev. As a result, I made some changes to the initialization numbers in gamecon. The problems are these:
1. Analog trigger axes come to rest at the low end of their value range. As a result XBMC thinks that the triggers are always being pulled negative. Creating a unattainable "false bottom" for analog triggers equidistant from the resting and max values prevents this.
2. The theoretical range for all Gamecube axes is 0-255. These values are possible, but only when the controllers are taken out of their frames, because the plastic limits their range of motion. The following is a quote from the Linux Kernel Documentation(italics added for emphasis):
input_set_abs_params(button_dev, ABS_X, 0, 255, 4, 8);
This setting would be appropriate for a joystick X axis, with the minimum of 0, maximum of 255 (which the joystick *must* be able to reach, no problem if it sometimes reports more, but it must be able to always reach the min and max values), with noise in the data up to +- 4, and with a center flat position of size 8.
I tested the four controllers I own and unfortunately, there's a good bit of variance between them. The values I ended up with represent worst case ranges (ensuring all the axes of all four gamepads were well within reach of the mins and maxes) and midpoints that represent axes at rest within precision.
Even if these values do not perfectly suit all Gamecube gamepads, they should be an improvement over the unattainable 0-255.
That more-or-less covers it to where I am today. I'm happy to say that XBMC is fully functional, and I'm using it in my bedroom now with no input device other than a Gamecube controller. There are some things I left out that are very specific to my hardware build. I can cover some of those things (joystick module initialization, keybinding xml, etc.) when I can write a proper Quart how-to. In the meantime, I need to try and get some of these things patched in officially and make this easier to replicate.
Quart: (Re)Enter the Gamecube

In the last post I laid out the motivation for the little network appliance I've dubbed Quart. The reason for the name is that I'm enclosing and operating a Raspberry Pi inside the nearly-quart-sized Nintendo Gamecube, which has been collecting dust in the basement for the last six years or so, since we replaced it with the Wii.
Why Gamecube?
After all, this system lived out a relatively short tenure as a video input in our household and doesn't evoke the same nostalgia as, say, Super Nintendo (or more in my case, Commodore 64). In fact, the short answer to the question above is: We couldn't find the Super Nintendo. But having decided on the Gamecube, I hit on a number of other great qualifications that make RPi and Gamecube a delightful abomination.
Cheap and Available
I hit on this already. What else are you going to do with the bloody thing? If you still own a Gamecube, you likely have a Wii as well. The Wii is, of course, fully backward compatible. So your Gamecube is either on your shelf, or the one at your local game trader; waiting to be sold for a pittance.
Relatively Small
We saw Nintendo and competitors take drastically different paths for the first time in this generation. Sony and newcomer Microsoft came out with their enthusiast-oriented powerhouses, while Nintendo released the smaller, lower-powered, inexpensive Gamecube. Admittedly it's still quite a bit larger than cases made to fit a Pi snugly, but it cleanly exposes the required controller ports, power and reset buttons.
Serviceable
Once you get past the four blasted security screws on the bottom, and start pulling it apart you may start noticing how well the various concerns are isolated and accessible. We end up using precious little of the remaining guts, but the wheat is cleanly separated from the chaff. More details on this later.
Buttons
Remember, one of the major requirements for this system is that all user functions will be available via the gamepad. Gamecube controllers have an ample number of inputs, and even sport some fairly modern concepts, like analog triggers, which make XBMC navigation a far more pleasurable experience.
Features
All four control ports are fed to GPIO and are functional using Markus Hiienkari's work with the original Linux gamecon driver by Vojtech Pavlik, and some modifications.
Runs OpenELEC, forked to support SDL gamepad input and modified gamecon driver.
Integrated power button and LED
Integrated reset button
Integrated classic power and AV cables

Standard male USB A cable with power leads spliced to the original Gamecube power adapter. Splice is concealed in a small, clasped component case.

Small Cat 5 extension surfaces below the chassis, and can be enclosed under the "Hi Speed Port" placeholder.
Quart: A Raspberry Pi Prototype
Recently I have been spending my nights obsessed with this latest prototype based on everyone's favorite low-cost, low-power, educational computing platform, Raspberry Pi. I have to say, this platform and its community have cleared away any fear that the tech industry would someday yield nothing but and endless supply of lowest-common-denominator targeted "gadgets", leaving no refuge for thought. Nay, this is in fact a golden age for the curious and inventive. So now with my jaded husk removed and my enthusiasm refreshed it's time to document all the things, because I've been having too much fun to stop.
Motivation

Quart Logo by Emily Griffin. Raspberry Pi is a trademark of the Raspberry Pi Foundation.
The prototype I'm now affectionately referring to as "Quart" started with my dissatisfaction with using my XBox 360 as the media solution for our bedroom. The Windows Media Center Extender has been worthy of its tenure in our home, but every time I wanted to play a game, I'd be missing out on important visual details (truer every year), due to the extremely dated, stereo, standard definition tube in that room. Call me cheap, I just can't justify another LCD for a room where it would be so casually used. I moved the 360 downstairs in time to play Halo 4.
Enter XBMC as the obvious front runner. I really have only one overarching SAF feature requirement for this particular terminal, and that is to watch TV upstairs. TV, in this scenario is primarily qualified as recorded shows. I don't witness a lot of channel surfing and god knows I hate doing it. Nevertheless I seem to get both features with MediaPortal on my server and the latest Frodo release of XBMC. Let me say right now, from the perspective of an MCE stalwart, XBMC's is not a great TV experience right now. It's a brand new feature so I'm sure it will be improving. However this is a decision that reflects where the cable TV sits on my own list of priories, when laid next to other virtues; flexibility, internet streaming options, active support and great new features like mobile DLNA and Airplay streaming.
So what else was the hardware going to be? I had looked at some passively cooled Atom/Ion devices in the past, but this decision did not take long. The RPi runs at a positively green 3.5 Watts under load and is completely silent. Maybe not the most powerful system, but this room needed a light terminal. Now, with an open source 10 foot interface, open source operating system and open hardware platform, I could look at the whole picture with an ideal in mind.
The Ideal
Having used the XBox as an extender, It's easy to see that the gamepad as a 10-foot control peripheral works in this scenario. I simply don't need another remote for this room. Ultimately no remote, however ergonomically designed, works as well in the dark as a gamepad, and a UI built to support it. This may be a polarizing point, and I'm willing to concede that it requires two whole hands, and that in a living room it would never fly. I can't imagine flipping on my TV and expecting a visitor to find the game or start the movie this way, but this is the bedroom. It needs to be easy to use for us, but the muscle memory is an inexpensive one-time cost.
Also, my wife and I are on the cusp of generations X and Y. Are there games in our room? Yes, there are games in our room. Naturally this is not a beefy device, but it's more than capable of being a great platform on which to curate some of my favorites of old and serve them up in a pleasing way for myself, my wife and for posterity. So here then is the short list of targeted features/qualities.
1. Plays recorded cable programming from TV server
2. Plays my old games from dusty platforms
3. All functionality must be gamepad accessible. I'll be able to SSH into it for maintenance, but I don't intend to attach a keyboard or anything else.
4. Sturdy enclosure, well integrated with gamepad/s. Should be pleasing to the eye, though it will be in a cabinet.
5. Fast boots/game loads
Incidentally, similar forays by Steam and OUYA lend credence to the concept of a light-weight Linux-based network appliance as a 10-foot entertainment hub.
Current progress to these ends discussed in the next post.
Dism: How did I miss this?
Not-so-recently I dispensed with using optical installation media for pretty much everything. This of course includes Windows operating systems so I always have a 4GB flash drive on hand with whatever version of Windows I'm currently running. This is not always a happy-path sort of operation and today I found myself exasperated trying to install Hyper-V as "Add Windows Features" chugged along in vain doing God-knows-what as I waited impatiently. My expectation was that it would recognize my flash drive and that would be the end of it, but it was not to be. A quick web search yielded an answer more in the form of fishing lesson, than fish (much thanks to Andre Ziegler). Open an elevated command prompt and use the Deployment Image Servicing and Management tool (DISM) with the proper arguments and voila.
C:\WINDOWS\system32>Dism /online /enable-feature /all /featurename:Microsoft-Hyper-V /Source:h:\sources\sxs /LimitAccess
Deployment Image Servicing and Management tool

Version: 6.2.9200.16384
Image Version: 6.2.9200.16384
Enabling feature(s)

[==========================100.0%==========================]

The operation completed successfully.

Restart Windows to complete this operation.

Do you want to restart the computer now? (Y/N)
Roslyn + NUnit
Last night I sat down to work on my most recent project (full details another time, I promise). What I needed was a custom NUnit test runner. It didn't need to use Roslyn necessarily, but a large part of the project already relies on it, and you gotta love being able to emit directly to a memory buffer. Admittedly it only implements a subset of the NUnit spec, and I do intend to enhance it, but I did it in only a few hours! Probably most of that time was investigating the spec and writing tests.
using System; using System.Collections.Generic; using System.Linq; using System.Reflection; using Roslyn.Compilers.CSharp; using System.IO; using Roslyn.Compilers; using NUnit.Framework; namespace com.griffinscs.Roslyn.NUnit { public interface ITestResult { object Fixture { get; } MethodInfo Method { get; } Exception Result { get; } } public class TestRunner { private class TestResult : ITestResult { public object Fixture { get; internal set; } public MethodInfo Method { get; internal set; } public Exception Result { get; internal set; } } private Exception CaptureException(Action action) { try { action.Invoke(); } catch(TargetInvocationException e) { return e.InnerException; } return null; } private IEnumerable<ITestResult> RunTest(object fixture, MethodInfo method) { return method.GetCustomAttributes( typeof(TestAttribute), true).Cast<TestAttribute>().Select( attr => { return new TestResult() { Fixture = fixture, Method = method, Result = CaptureException(() => method.Invoke(fixture, null)) }; }).Concat( method.GetCustomAttributes(typeof(TestCaseAttribute), true).Cast<TestCaseAttribute>().Select( attr => { return new TestResult() { Fixture = fixture, Method = method, Result = CaptureException(() => method.Invoke(fixture, attr.Arguments)) }; } )); } private IEnumerable<ITestResult> TryRunFixture(Type type) { return type.GetCustomAttributes( typeof(TestFixtureAttribute), true).Cast<TestFixtureAttribute>().Select( attr=>type.GetConstructor(attr.TypeArgs).Invoke(attr.Arguments)).SelectMany( fixture=> type.GetMethods(BindingFlags.Instance | BindingFlags.Public).SelectMany( method=>RunTest(fixture, method))); } public IEnumerable<ITestResult> Run(Compilation compilation) { Assembly assembly; using (var emitStream = new MemoryStream()) { var emitResult = compilation.Emit(emitStream); if (emitResult.Diagnostics.Any(diag => diag.Info.Severity == DiagnosticSeverity.Error)) { return null; } emitStream.Flush(); try { assembly = Assembly.Load(emitStream.GetBuffer()); } catch (BadImageFormatException) { return null; } } return assembly.GetTypes().SelectMany(TryRunFixture); } } }
Update: HTPC IR…
In my last post I talked about some of the remaining issues to solve in my attempt to migrate to a new, inexpensive remote for my HTPC. I tend to err on the side of over-engineering solutions to problems like these and well...this time is no exception. My solution consists of a virtual HID shim/miniport driver with an interface to user mode software. I wrapped this in a managed "VirtualKeyboard" class so I can call it from a service which listens for my remote commands to come in on the eHome Remote Receiver.
The benefits of this approach are twofold over sending out any kind of windows message, which is what every boxed solution I found does. First, I can code the entire solution into the service layer. Placing this functionality in a service run automatically as LocalSystem allows it to behave like a first-class input device. Always available and decoupled from UI. Yes you can inherit NativeWindow, pump and send Windows messages in a service, but I couldn't figure out any way to send a key-press there. Even if I could do it that way I don't think I'd want to.
The second benefit is proper integration with Media Center, and anything else that may require a true device identity. In order to support Media Center's 10-key SMS style text entry feature, it needs to be able to distinguish buttons pressed by a remote, which is modeled as a keyboard device in Windows, and a true keyboard. Key-presses originating from Windows messages are always handled as keyboard input. The distinction between keyboard and remote is made in the registry ("HKLM\SOFTWARE\Microsoft\Windows\CurrentVersion\Media Center\Remote Controls"). The names of the values defined in this key map to hardware ID's to be handled as remotes.
I can see this component being useful with a number of software suites and other automation scenarios. IR Server Suite, EventGhost and AutoHotkey come to mind. As it is, the service I wrote is special-cased for my remote, but if you have need for such a beast, drop me a line. I can likely adapt it to other needs.
HTPC IR solutions and remaining issues
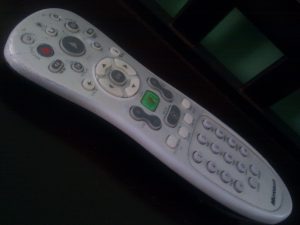
I knew this was coming. My HTPC gets a much needed upgrade and now I can't help but be plagued by every remaining problem with my setup. This week's PITA is our weathered, overused eHome remote. It has been with us since 2005, allowing us a one remote experience, with its programmable TV power, receiver volume and mute buttons and tight Media Center integration. I extended its life a few times, when a few oft-used buttons have stopped responding, by taking it apart and giving it the cotton swab and rubbing alcohol treatment. Look at this thing though. It's starting to affect my credibility as an HTPC enthusiast. Time to put it out to pasture.
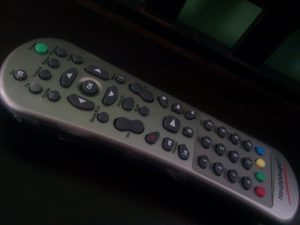
So just run to Microcenter and pick up a Logitech Harmony right? Well...I have reservations, not the least of which is the perfectly functional eHome Remote Receiver already in my possession. The greatest problem I see is the expense, coupled with the already tech-fixated 18 month old boy hobbling around my living room. No, I think what I'd rather do is use the PC itself to convert signals from the non-universal remote that came with one of my Hauppauge tuners, and has since been collecting dust in the closet. It has plenty of the right buttons I need, and will be no significant loss should I find it's trampled-lifeless husk in the middle of the living room floor some evening. I may use an IR blaster to control my receiver, but I think I won't need to with the sound codec on this new motherboard.
So far I have done some research into the software that's out there to capture the signals from the new remote and send out the right commands. There are some good libraries out there, and with the eHome Receiver being an HID device, I should have an easy time of writing a little special-cased code if I need to in order to get the job done. I settled on IR Server Suite, which is actually part of the Media Portal project. IRSS has a translator app that can capture incoming IR messages and respond in different ways (Windows messages, key-presses, blasting another IR message, etc). This got me the majority of the functionality I needed, but I have two remaining gotchas:
1. I can't find a key code for the alphanumeric keys on the eHome remote. Sending a keypad number will not suffice for Media Center's text input functionality. I think these keys may map to HID's Phone Key usages, but I still need to test that theory.
2. Since, the translator application's functional paths inside a GUI application, rather than the IR service, I don't have any IR functionality on the welcome screen.
See Followup
Source
As requested, I have opened the full source for TranscodeToMP4. You can find it in my Blog repository on GitHub.
Transcode to MP4
A few weeks ago, I talked about playing with WPF and DirectShow with WPF MediaKit. I wanted to finish a video transcoder project I had laying around for some time. Originally, it was a very simple WinForms app that guides the process of building a graph in DirectShow to extract the audio and video streams from some video file source, send them through some other compressor (or not), and place them in an MP4 container. The goal was to allow my wife to convert the files from her camera, so she could post them on YouTube (She didn't want to use GraphEdit, imagine that). At the time, HandBrake didn't exist, or wasn't available on Windows and there were plenty of paid options, but I figured I could mock up a solution at a similar cost. That was true, until I moved it to WPF and added a video preview, but whatever, it was fun. This is the result: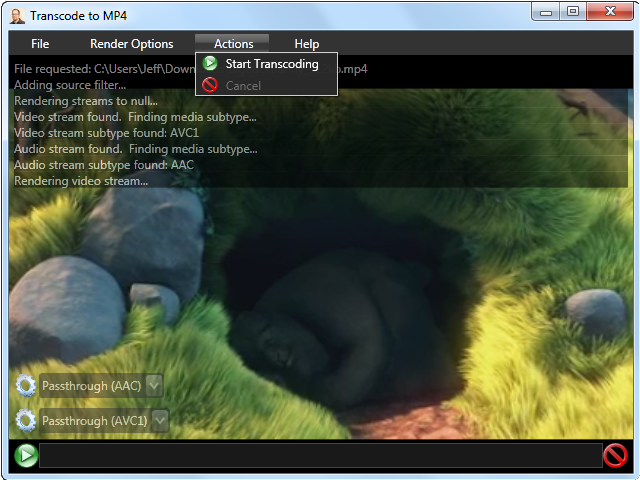
Transcode to MP4 - Version 1.0.0.0
Source
Required:
Haali Media Splitter: Actually, only the MP4 Multiplexer is required, but the splitter is a handy file source, supporting many formats.
Recomended:
FFDShow Tryouts: This adds a ton of functionality and customization, through the filter settings dialogs. See Issues and Solutions below.
MONOGRAM AAC Encoder: This is my own build of this filter. I found this and a number of other GPL and LGPL based DirectShow filters at RadScorpion's blog. I wanted to use this filter, but it doesn't register as an Audio Compressor in DirectShow, which this Transcoder requires. If you would like the source for my changes, please don't hesitate to ask.
There are a number of other filter options you can experiment with, and of course your mileage may vary. Also, this program will attempt to allow you to make any decision you want about what codecs you would like to use. That doesn't mean that the MP4 Multiplexer or your video player of choice will appreciate the decision you made, and this program does not protect you from this.
Options:
The Show Preview option can be found in the render options menu. Some filters don't work so nicely with the Pin Tee Filter, which is used to show a video preview during the encoding process. Turning off the Show Preview option lets this program build a graph without including the Pin Tee and Video Renderer. Media Center filters will require the Show Preview setting to be off.
The Use Clock option is the same as the one found in GraphEdit. It will generally allow the graph to progress at or below the speed of playback. You should always try leaving this option off for the sake of speed, but some filters don't appreciate being rushed.
Clicking on the gear icon next to the selected decoder filter will pop the filter's configuration dialog (if it has one). These are implemented by the filter's vendor.
Issues and Solutions:
I found out while testing this with the filters Media Center uses with WTV and DVR-MS files that some files aren't so happy working outside the bounds of their original intent. I did have success transcoding these formats, however, by turning off the Show Preview option.
In testing with FFDShow Tryouts, files with MPEG audio streams tended to halt or crash the program. This was corrected by going into the FFDShow Audio Decoder Configuration in the start menu, and under Codecs, I switched the MP1,MP2 decoder from libmad to libavcodec.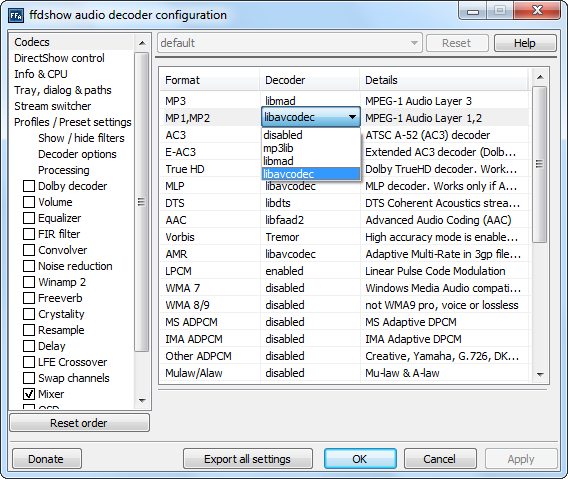
Why not just use HandBrake now?
By all means, you should if it suits your needs. HandBrake offers tons of options, is relatively user friendly and doesn't require all this mucking about with DirectShow filters. If it were out when I wrote the first pass of this, I would have had no motivation to write it. However this is an extremely open-ended tool, so if you need to transcode something that handbrake doesn't support, but for which there are DirectShow filters available, you can use this as an alternative to GraphEdit. Media Center files are a good example of this.
Please leave me a feedback if you are experiencing issues using this tool, you have feature requests, or other questions.
